Deluge Step By Step Guide


You might be wondering why this guide is being made on the least used torrenting client. The main reason is to let you know what are the things that are inside Deluge and why it is one of the best light torrenting tools that you can use.
Deluge torrent tool is one of the most underrated and underused tools, which is mostly overlooked by most of the customers. But many customers who use this tool and know what it can be done with it never want to change and go to any different one.
This guide is made so that you can learn why Deluge is so powerful to be used and how it can be made efficient, and moreover to learn how to use Deluge clients.
Basically Deluge is a fully functional cross-platform Bittorrent client, it is designed in such a way that it can both run as a desktop application as well as remote client-server.
It is also a function known as thin client mode where it handles all your torrenting activity in the background of your machine while you try connecting it from different platforms.
Like this, there are many features of Deluge that can be used by you, and this makes it reliable, convenient, and easy to use.
This guide will help you know how you can optimize your Deluge BitTorrent client so that you can use it easily and make it most out of it.
Here are the contents that have been discussed in the below sections:-
- What is Deluge?
- How can you download it?
- Advantage and disadvantage of using it
- How to install Deluge on different platforms?
- How to manage Deluge?
- How can you optimize your experience?
- How to maximize your speed and How to increase anonymity?
- How to fix common deluge errors or troubleshoot them?
Table of Contents
ToggleWhat is Deluge?
Deluge is an open-source BitTorrent client that is being used by many customers. It is a cross-platform tool which means it can be run on Windows, Linux, and macOS. One of the reasons that it is so famous is because it is free of cost and doesn’t annoy with advertisements over the application.
It is written in python language so you can see in code that there is no malicious thing in it and protects the privacy of its customers. If you want to analyze the code you can click here.
It is one of the most used torrent Deluge clients that are being used by different customers because it’s light, reliable, and fast. Though it is simple to use you can customize it according to your needs. Deluge is considered the king of customization when it comes to torrenting. With the help of different plugins or software, you can customize it and take it to another level of torrenting.
When you compare Deluge with other torrenting clients it is simple in use, fast, light, and comes with no ads. As it covers very low resources on your computer you can run it either as a desktop application or in the background process.
How can you download it?
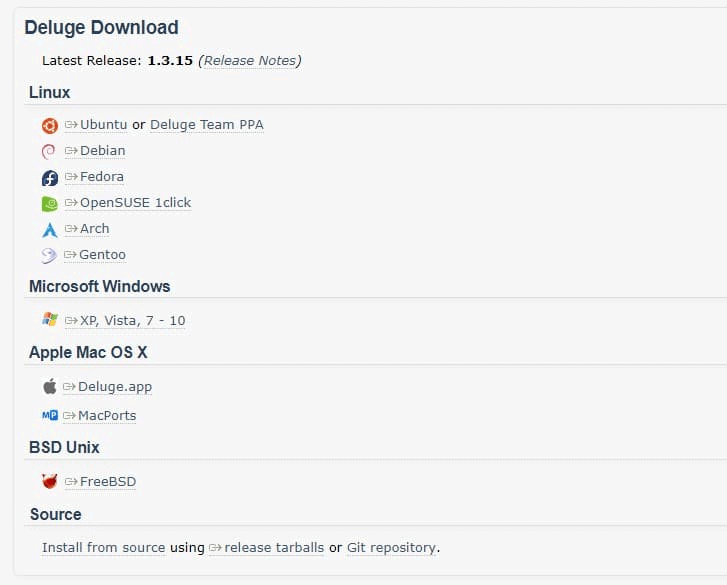
You can download the Deluge of its latest version from its official website. Just click here and download it according to your PC configurations.
Advantage and disadvantage of using it
If you are still having doubts about using Deluge as your BitTorrent client you can view the below discussion where we have to make points of its advantages and disadvantages. Where you can make your mind whether to use it or not.
Advantages:-
- There are no associated advertisements with the product.
- With the help of Deluge plugins, it can become more efficient.
- It is an open-source software and is free of cost.
- It is a super light application for BitTorrent clients.
- It can encrypt BitTorrent traffic through the use of MSE/PE
- It can be directly run from USB or HDD without installing it in the main PC
- It comes with all the basic features.
- ]It has both a graphical interface as well as a command-line to use it.
- It allows automatic port mapping with UPnP, NAT-PMP, NAT for automatic router configuration.
Disadvantage:-
- You can’t override queue settings to force start a download.
- There is no search engine built inside it.
- It is not available to stream videos when they are downloading it but to work it around you can use a plugin to stream that video.
- Magnet URI functionality is narrowed in it. You cannot find any information about it through the magnet link until the download has started.
- There is no super seeding available by default but you can counter it by apply plugin on it.
- Doesn’t give the functionality of tracker exchange
- There’s not much support in web seeding
- Can’t share files using embedded tracker
- Daemon plugin used too much CPU resources as compared to different clients.
How to install Deluge on different platforms?
When you want to download Deluge on your PC you get various types of choices for different platforms.
How to install Deluge Linux?
There are two ways you can install Deluge on your Linux operating system.
- To install on Deluge Ubuntu:-Run the following command on the shell so that it can download and install its repository on it.
sudo add-apt-repository ppa:deluge-team/ppa
sudo apt-get update
sudo apt-get install deluge
- To install on Deluge Debian:- you first need to run the below command so that it can install the repository of Deluge.
nano /etc/apt/sources.list
Then copy/paste the following lines at the end of the file.
#Deluge PPA
deb http://ppa.launchpad.net/deluge-team/ppa/ubuntu trusty main
deb-src http://ppa.launchpad.net/deluge-team/ppa/ubuntu trusty main
Save your changes, then update and install.
apt-get update
apt-get install -t trusty deluged deluge-web
How to Install Deluge for Windows?
It is the same process that is followed for most programs in windows. Download the version which is supported on windows and run it.
Click on next and remain the setting as default.
Now after you have clicked on next select the Deluge settings which you want to manage with it.
Now select the location where you want to install the Deluge client on your PC and select install. It will install on your PC. you might get admin access notification so please allow it so that it can communicate free. But make sure when you are connected to open wifi in public areas that your Deluge default port on which this works are closed or you can get hack easily with it.
How to manage Deluge?
There are different steps you need to follow when you are managing Deluge on your PC.
Logging to Deluge
- You can see your credentials in your client areas
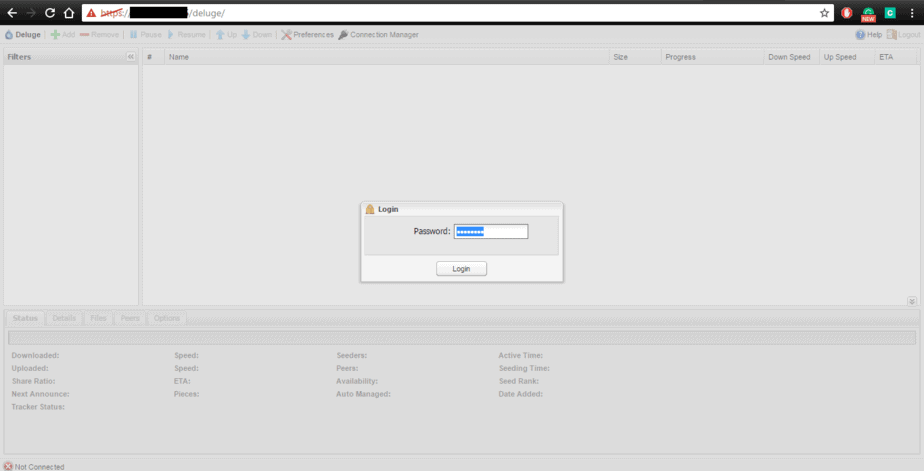
- Go to the URL of Deluge client where you can see that the format of the URL will be like this- https://111.222.333.444/deluge/
Now you can see that a login prompt has open enter the credential from your client area and click on login.
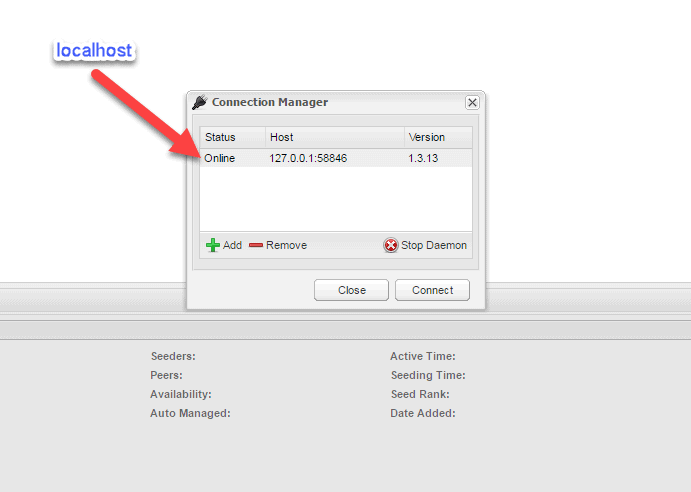
In the next step, you can see that a connection manager prompt will open in your screen where you have to select the host you want to connect to and click on enter.
After you have logged in successfully you will see a dashboard on your screen.
One of the most important things that you will notice in the dashboard is the menu bar. Below we have describes each and everything in the menu bar so that you get a clear idea of what button can be used in what ways.
How can you load torrents in Deluge?
With the help of a Deluge client, there are two ways you can load torrent in it. Either from the URL link or through adding the torrent file directly. If you will click on the “Add” button on the menu bar you will get a window like this.
“File” –with the help of the File button you can browse to the directory where your torrent file is located and can add it.
“URL” – With this option you can add the URL link of the torrent that you want to download.
“Files” tab –will notify you of all the directories that are contained in the torrent files.
“Options” tab –with this tab you can set your maximum and minimum download/upload speed and also help you to set the destination where you want to download the torrent.
“Remove” button –removes the torrent that was added previously.
After we have added the torrent file by choosing any of the options you can see the torrent file in your dashboard being downloaded.
How to create new torrents using Deluge?
In Deluge you can’t use WebUI to create torrents from it, you have to use Deluge thin client or Deluge GTK for creating torrents.
To do that you have to connect through WInSPC and then open Deluge GTK.
When GTK gets open click on the file tab top right corner and select create torrent option in it.
A window will open on your screen like this.
“File” – this button will help you to select the directory from which you want to add your torrent.
“Folder” –it will help you to browse all the folders that you want to find from which you want to create a torrent.
“Info” – this tab will help you to find information about the torrent like the author or comments in it.
“Trackers” –it will help you to add trackers to the file you want to create a torrent for.
“Web seeds” – This tab is used to add the location of the web address to the hostel folder when you are creating a torrent.
“Options” – In this tab, you can set the piece size of the torrent and can also set the private file to the torrent.
“Save” – Save your torrent.
Dashboard
To see information for a particular torrent file you just have to select the torrent and you can see the information below it.
You can also find all the additional information about the torrent like status, trackers, health, etc.
Status tab
This the information you can find in the Status tab:-
“Downloaded” – Showing how much your torrent file is downloaded currently.
“Speed (Download)” – Showing at what speed it is being downloaded.
“Uploaded” – Shows how much data is being uploaded.
“Speed (Upload)” – Showing at what speed it is being uploaded
“Seeders” – Showing how many seeders are connected currently in the torrent.
“Peers” – Showing how many peers are connected currently.
“Active Time” – Showing for how much time the torrent is active.
“Seeding Time” – Showing how much a torrent file is seeding.
“Share Ratio” – showing the ratio of how much data is being uploaded to the data for how much it is downloaded.
“ETA”- Estimated time that your torrent will take to download the file.
“Tracker Status” – Is showing information about the trackers and its status.
“Pieces” – Is showing how many pieces your torrent file distributed and how long will it take.
Details tab
In this tab, you can see all the information regarding your torrent file.
“Name” – Name of your torrent file.
“Hash” – Hash representation of your torrent file name.
“Path” – Path to where your torrent is being downloaded to.
“Total size” – Total size of your torrent file.
“# of files” –shows how many files are there in your torrent file.
“Comment” – Comment that was created by the author of the torrent file.
“Status” – Status of your torrent file.
“Tracker” – Tracker from where you have downloaded your torrent file.
Files tab
In the Files tab, you can find information about the torrent files.
You can find the names of the files, their priorities, status, and size of the file.
Peers tab
The Peers tab, give you info like the peers that are connected right now, which are active, the country they are located in, and speed your getting.
Options tab
As the name suggests it gives you the option to edit in your torrent files.
There is 3 bifurcations in option tabs the bandwidth, queue, and general tab for editing.
Bandwidth
“Max Download Speed” – from here you can set the maximum download speed you want for your torrent.
“Maximal Upload Speed” – from here you can set the maximum upload speed you want for your torrent
“Max Connections” – You can set the maximum connections for your torrent from here.
“Max Upload Slots” – you can set the maximum no of slots you want for uploading your torrent.
Queue
“Auto Managed” –after the torrent has been downloaded you can auto manage from here.
“Stop seed at ratio” – you can auto-stop the seeding once a particular ratio has been achieved from it.
“Remove at ratio” – you can remove the torrent file after you have reached a particular ratio and command Deluge stop seeding.
“Move Completed” – you can set the directory that you want your torrent file in after it has been downloaded.
General
“Prioritize First/Last” –you can set priority like which file you wanted to download first when there is a long queue of downloads.
“Edit Trackers” – here you can edit the tracker list from which your torrent is downloaded from.
Bottom menu bar explained
The bottom menu bar gives you some special information. They give you the total speed that you are getting for downloading/uploading. You can also set the server throttle level if you want. It shows how much disk space is there on your server.
Left side menu
The left side menu bar gives you quick info about the torrents that have been loaded in Deluge downloads. It gives information about which torrent is finished and which is remaining.
“All” –Total torrents that are there in the Deluge list.
“Downloading” –total torrents that are currently in downloading state.
“Seeding” – total torrents that are currently in seeding state.
“Paused” – All torrents which are paused right now.
“Checking” – denotes all the torrents that are checked by torrent clients
“Error” – denotes the number of torrents that are facing problems in either downloading or in seeding because of which they are showing errors.
“Trackers” – gives information about the trackers that are being loaded.
How can you optimize your experience?
Now let’s see how you can optimize your experience after you have learned everything about Deluge.
How to organize your downloads?
You will notice that after some time your download folder gets messy and all your downloads are not in the place that you want. Hence with the help of Deluge, you can organize those files and folders the way you want and command Deluge to keep it that way.
Go to Edit-> Preferences
Change the location according to you and by default, the Deluge client will save all your downloads in the download folder.
You can change that setting by going to the download section and beside folders download to option choose the path that you want your download in and click apply.
Install Deluge plugins
It’s because of plugins that make Deluge so efficient and reliable to use than other clients.
For installing different types of plugins you can visit Deluge official website for plugins where you will get 3rdrd party, browsers, and application plugin and download it from there. Just click here to visit the website.
There is an example below which will show you how you can stream video directly from a Deluge client by using a 3rd party app.
Find the plugin that is necessary for streaming the video from the Deluge website and download the .egg file from it and make sure that version you have downloaded matches with your operating system.
Once the plugin has been downloaded-go to Edit->Preferences->Plugins->Installed plugins
Select the version that you want to add to your Deluge client.
After it has been installed just select the box beside streaming and after a second or two it will denote streaming on the left menu bar.

How to set up a thin client for remote management?
To make your device more anonymous and to improve you can download plugins on remote servers rather than downloading it on your PC.
Deluge daemon gives you special features where you can install it on a remote server and with the help of other computers, you can access it from anywhere with the help of WebUI for Deluge application.
Before you deploy daemon on the server you have to set up the remote server first. Once you have done that you can go further and configure the client for using and accessing it.
Go to Preferences->Interface->Disable Classic Mode it will hide most of the daemon information on your PC.
Restart the client once again and after that, you will see the following message on your screen.
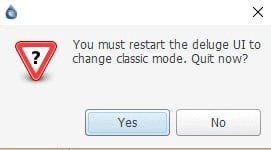
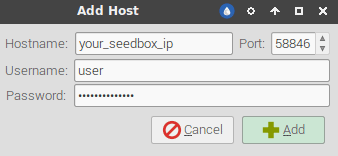
After this click on the add button so that you can add your IP address, your username, and password in it.
How to control Deluge remotely with a thin client?
Remote access for your client helps you to access and your Deluge client from everywhere. It is one of the most awesome features that Deluge has. Which allows you to manage all your torrent files remotely.
To prepare your machine to make connections with the remote server you have to the following procedures.
Log in to your Seedbox/VPS
We need to set up remote clients first before we have Set Deluge remote access.
Log in to your seedbox via SSH.
run this command so that you can switch to the user account.
su - user
The reason behind this is due to account privileges you have to switch to the user account.
We need to find out the information that you need for remote access. You can find IP address, username, password, port no, and host of the seedbox from your client area. Set the port to 58846 for communication.
If this is not a case, follow these steps to find your details:
- Find your IP address:
ip a
or
/sbin/ifconfig
- Find your username:
whoami
- Use the following command to get Deluge remote port:
sed -rn 's/(.*)"daemon_port": (.*),/\2/p' ~/.config/deluge/core.conf
- Find your password:
sed -rn "s/$(whoami):(.*):(.*)/\1/p" ~/.config/deluge/auth
Configure Deluge remote option
Now you need to do some working from your Seedbox. So log in to your client area remotely via SSH. If you don’t know how you can follow the steps below.
We need to stop existing Deluge service first:
systemctl stop deluged
Or if you are using our newest template:
systemctl stop deluged@user
IF you have access to the ssh as root account change it to the user account so that connection can be established.
su - user
The next step is to set a password:
echo "user:MyPassword:10" >> ~/.config/deluge/auth
Please allow remote connections so that everything can work properly.
deluge-console "config -s allow_remote True"
deluge-console "config allow_remote
Start Deluge:
deluged
Setting your Local Deluge client
First, we need to disable class mode. So go to Preference->Interface and disable it.
Adding Remote connection
After you have disabled it now restart your client so that connection can be established. Once you have restarted it you will see a window like this.
If this window doesn’t show up, go to Edit->Connection Manager or press CTRL+M. Click on the add button and enter the credential that you have found earlier.
Adding Host to it.
You will need to enter information like the below picture to add the host.
After you have entered all the information click on the add button and then connect. Now you have connected, now you can use remote access for Deluge clients.
How to change a Deluge WebUI password?
Log in to the Deluge client using webUI access URL-https://seedboxIP/deluge and access it using the default password.
Once the client has open select Preference and then interface option.
From this page, you can change your password from default one to the password that you want. Once you have all the entries in it you can click on Ok->apply->ok so that the new password is set as a new credential for your Deluge client.
Scheduler Plugin for Deluge
One of the most used and useful features that Deluge offer is a scheduler plugin which helps you to set a limit on the download/upload bandwidth. Here’s a short procedure of how you can activate a scheduler plugin in your client.
Login to the WebUI of Deluge client using the web access URL.
Go to Preferences > Plugins
Enable the scheduler and hit on Ok. close the prompt screen that appears and try to refresh the page.
The next time you go to Preferences, Scheduler should be available at the bottom as a Category.
How to set up a YaRSS2 plugin so that you use RSS with a Deluge client?
In this section, it has been discussed how you can use RSS with YasRDD2 plugin by installing it on your Deluge client. For the first, you should install the YaRSS2 plugin.
Go to your WebUI for Deluge client and then go to preferences and then go to the Plugins section where you can search and install YaRSS2.
When you click on the add button a prompt will come in front of your screen. It will ask you about the .egg file which is a python made file that helps you to use RSS.
So to find out your “Python” version you need to connect to your “ssh/root” and type in this command “python –version”.
When you have chosen the python version that you want to download. Now go to the website and download the plugin egg for that specific python version.
After you have downloaded the plugin, now you have to go back to the WebUI where you have to attach the path of the downloaded plugin.

Use YaRSS2 plugin
After the installing of the plugin has been completed go back to the remote desktop and go to Applications -> Internet -> Deluge. This step will help you to open a Deluge thin client because the YaRSS2 is not compatible with the WebUI version of Deluge.
After you have opened the Deluge client you have to add the feed that you want to use so go to Preferences -> YaRSS2 > RSS Feed -> Add Feed.
Enter the name and URL of the RSS feed that you want to keep for it and then click on the apply button below.
Further, click on the Subscription tab and then select Add Subscription so that you can choose the RSS feed that you have added, give it a name and apply the filters accordingly. After you are done with all the procedures click on the save button.
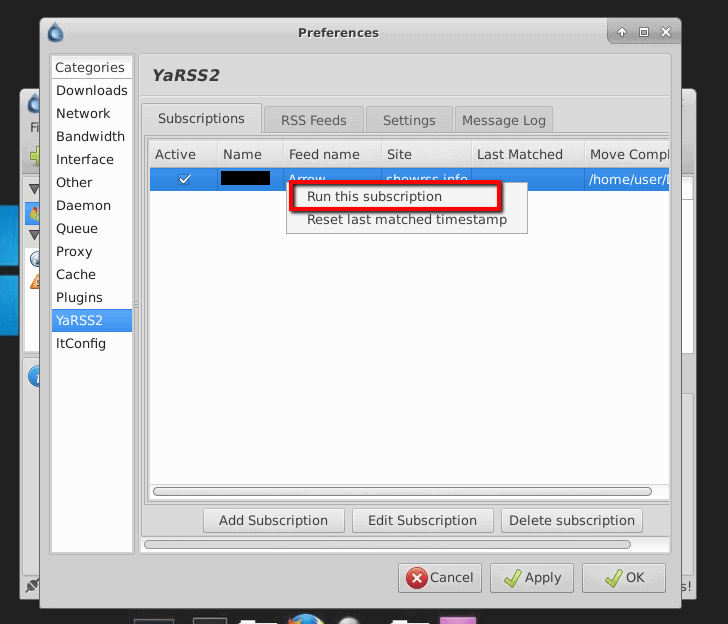
Now right click on the Subscription tab after that you can see that there is a subscription that you just added click on run this subscription and then click Ok.
Now you can notice that the torrents have started downloading on their own. Once the RSS feed has been added you can go again to WebUI to see the status of your torrent or you can keep using it from the GTK over the desktop. You can choose whichever way you like.
How to maximize your speed and How to increase anonymity?
The settings that are discussed below are only suggestions for as they don’t fit in every condition. They are applied to Deluge for specific conditions and how you can use them in it.
You might be having the best PC and would be using the best bandwidth that one can get but your ISP is also doing the best for blocking your torrent protocols so that it doesn’t work the way you were expecting.
These are some of the best deluge settings will help you to tackle them and will help you to provide mitigation for them. But if you are not happy with applying these settings then you can ignore them.
How can you lower the range of being throttled by your ISP?
For torrent to communicate between the inbound and outbound independently it is important to change its default setting for ports. The reason behind this is that lower ports are blocked by your ISP and create problems where if you change their settings it will be much easier for them to communicate outside.
Go to the Preference->Network under it and uncheck the box of random ports for both incoming and outgoing ports. Select the range between 50000 to 65000 port numbers and enter in it.
How to get more from Network Extra settings?
There might be some private tracker that will command you to disable P2P technologies from your client. If you are using private trackers for downloading torrents it is recommended that you should use all default settings on all the boxes in the Network Extra options. It will help you to find more peers for your download and will increase the speed as well.
Encryption in Deluge
For better connectivity with your peers, it is recommended that you should connect to those peers which have enabled encrypted protocol. Also, check that the network tab is enabled at the end of the Inbound/outbound encryption connection parameter.
How can you use Deluge port forwarding methods to make better connections?
If there are routers or firewalls present at your end then there are chances that they limit or block your peers which will affect your downloading speed. Hence if you want to tackle this it is suggested to use port forwarding from your router or firewall.
First, it is necessary to check your firewall or router that Deluge is allowed in inbound and outbound rules so that it can communicate with the peers easily.
This will help you to make forwarding easier so that they can bypass your firewall and router for connecting to peers much more easily.
How can you improve Download speed in Deluge clients?
You might think it is great to set your download speed to unlimited and set your upload speed to some extent. But BitTorrent doesn’t think like this, it has made such rules that your upload speed will depend on your download speed.
Basically it means that you can’t limit your upload speed too much or else your download speed will be affected with that amount. There is a concept in BitTorrent known as Choke in which if you limit your upload speed too much your download speed will get choked up.
Below are some steps which can help you to improve your download speeds:-
Step1. Test your original internet speed so that you can get an idea about your bandwidth. Click here for Speed Test.
Step 2. Configure the Bandwidth section in preferences
- Go to the Bandwidth option in Preferences
- Keep default settings in maximum connection and Upload slots.
- Set the maximum download speed Between 80% to 90% from your original speed test and set it to this.
- Set the maximum upload speed between 80% to 90% from your original speed test and set it to this.
- Leave the rest as default.
Step3. To maximize your queue settings
It is important to set correct queue settings so that not too much and not too little bandwidth is used. In Deluge, it is recommended that you should set your “Total active seeding” the same as “Total active” and the “Total active downloading” always lower.
How to Improve anonymity using a Deluge client?
Though Deluge is such a great torrenting client it has some common vulnerabilities as any other torrenting client which needs to be mitigated through.
As everybody wants to maintain anonymity when they are surfing the web or downloading torrents from websites. There are many reasons behind this like some are trying to hide their identity so that nobody can know they were and they were doing this and some are forced to do this because their government won’t allow them to do such a thing over the net.
For torrent users there are different reasons for hiding their identity some are hiding themselves from black hat hackers because of P2P connection they can get to you easily and some are hiding from their ISP providers so that they don’t throttle their BitTorrent network.
As to see your peers for the torrent you are downloading go to the WebUI of Deluge and right-click on the torrent and you will see the information about the peers that are connected.
There are various steps and techniques that you can apply for hiding your identity and to download torrents anonymously. Some of them are discussed below:-
- Virtual Private Network:- VPN is a tool used to provide an encrypted connection between you and your host so that the connection between you two is not compromised at any moment and nobody can know your original identity. It basically hides your IP address so that no one can know your true identity. It basically tunnels your connection to its server so that it can assign a different IP address that they have and you can browse without any fear. Some of the common VPNs that are being used are OpenVPN, ProtonVPN and etc. Which you can use before downloading your torrent file just connect to any VPN and then start your download which will make your connection encrypted and also hides your identity. You can check if the VPN works or not by connecting to it and check your IP on WhatsmyIP. So that you can make sure you have hidden your identity.
- Proxy servers:- Proxy server does not hide your IP address but will encrypt the connection you are communicating with the host so that no can interfere between this connection. It is much cheaper and faster than a VPN connection to be used. But the only factor that affects it is that it is less secure than a VPN which makes it more vulnerable to hackers and malicious actors. You can connect to a proxy server through Deluge just go to Options->Preferences->Connections-> Proxy server section. Enter the details of your proxy server and check all the boxes and click on apply and it will start your proxy server.
- Deluge Seedbox or Deluge VPS(Virtual private server):- If you want to upgrade your torrenting techniques and you are a person who downloads torrents daily then a Seedbox is the best place for you.
A seedbox is basically a dedicated server that is used for torrenting files and folders so that both your identity and files are at a safe place. It is nothing like VPN it just works on dedicated servers so that you can just log in and go to their servers and download torrents at their server. They provide a great speed so that both your uploads and downloads can be done at much greater speed and also now onwards they have also integrated some apps which will help you to find torrents.
Cheap Seedbox and Evoseedbox are the two most used seedbox nowadays which provide you a great speed for torrenting and many integrate apps so that they can help your torrenting experience get much better.
How to fix common Deluge errors or troubleshoot them?
As you know that not all torrent clients are trouble-free like that Deluge has some errors that can give you a headache to fix it. So below we have discussed some of the common errors that are generated in Deluge clients and also explain how we can solve them.
We have covered 3 top problems that you face with Deluge and have entered their solutions so that when you use Deluge for a torrent client you can solve these issues easily.
No connection for incoming:-
If you see that the torrent you are downloading has no Deluge incoming connections below the Deluge client it is because of port mapping. This will still help you download that torrent but won’t be able to seed it.
To solve these issues:-
- First, try restarting the firewall and router and watch if those are the ones that are blocking it.
- IF that doesn’t work see that your firewall is not blocking the Deluge extension because in some firewalls as default it stops incoming information for torrents.
What to do if there is Deluge torrent errors:-
When the downloading of your torrents stop randomly and it shows error then these are the conditions that you can go through.
- Check if the status of the torrent is correct or not.
- Check if your antivirus hasn’t stopped it.
- Upgrade or downgrade your program accordingly so that it starts working again.
Torrents are not downloading when works with VPN:-
Sometimes it will stop or Deluge slow download your torrents when you are using VPN with it. Usually, VPN does not differentiate between traffics to maintain the anonymity of the user.
The problem only occurs when there is a configuration error on your local machine or on the VPN server.
- Check if the firewall, router, or your antivirus aren’ blocking the program to run and if it is making an exception in it so that it tackles it.
- Disable the UPnP and NAT-PMP as they will automatically assign ports to the program that are blocked by your firewall or routers. To do this go to Edit->Preferences->Network->Network extras section and disable the boxes and click apply.
Final Words
This guide has been made so that it can be made familiar with the things you can do with a Deluge torrent client and why it is one of the best lightweight torrenting clients to use. This guide will help you to experience Deluge at its full potential and how to make most out of it. You can go for a Deluge torrent client if you want a lightweight torrenting client that has many plugins and options available for you to bring the best torrenting experience.
