How To Create Torrent On RuTorrent Seedbox For Private Trackers



One of the great features of Seedbox is you can create torrents and upload them remotely to any trackers via your Seedbox. You can use your Seedbox storage or your system’s storage as your file source of the torrent you wants to create from your Seedbox. Almost for every private tracker, uploading torrents can be a lot of advantages for users. You can boost your ratio by uploading staff to the trackers, as in this case only uploading data is count for your account. Also, some trackers offer special features for their uploaders.
Here’s the step by step easy tutorials of How to Create Torrent from Seedbox.
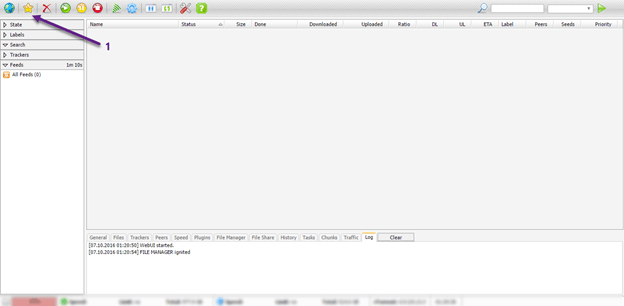
Step 1. Let’s start creating torrent. Click on it (“star” – the icon may vary based on your theme, but it is generally the second button).
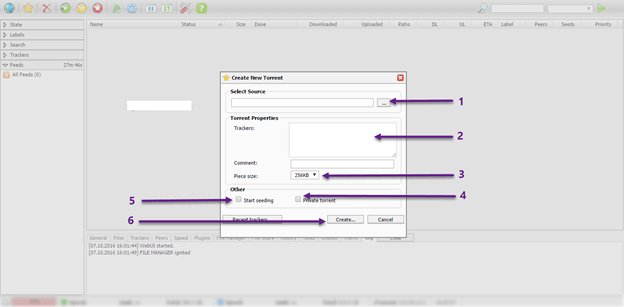
You will get pop-up screen automatically.
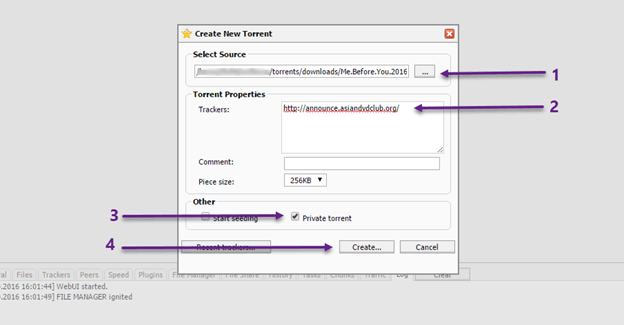
Here is some explanation about pop-up window above.
1. Select Source.
Path/ Location of Data required to create ‘.torrent’
2. Trackers
What is Trackers?
Tracker Announce URL. It keeps track of who is seeding & who is downloading along with data send or received, duration how long you seeding/ seeded. It is a little different URL then site URL & it works independently (mean it has nothing to do if the site is up or down). Since it keeps all the track records of stats, therefore we usually call torrent site as ‘Trackers’. Tracker gets update mean send stats at the different time, which varies from 15 min – 1 hours depending on how it is configured by the site. That’s why our stats don’t update after a while.
3. Piece size
Piece Length = Number of bytes per piece. This is commonly 28.
Pieces = a hash list, i.e., a concatenation of each piece’s SHA-1 hash. As SHA-1 returns a 160-bit hash, pieces will be a string whose length is a multiple of 160-bits. If the torrent contains multiple files, the pieces are formed by concatenating the files in the order they appear in the files dictionary (i.e. all pieces in the torrent are the full piece length except for the last piece, which may be shorter).
! Important Points to Remember
By default, it is set to 256, which is adequate till the data size of 8-10 Gb. For data above 10 Gb choosing bigger size is better option as it decreases size of created ‘.torrent’ file.
Imp – ‘.torrent’ created size inversely related to piece-size, i.e. smaller piece-size bigger ‘.torrent’ size.
Note – Many private trackers don’t allow ‘.torrent ‘ bigger than 1 Mb. At all such trackers changing piece, size is the only option.
What is Cross-seeding?
Seeding more than 1 tracker with same data is called cross-seeding. It is very helpful to save HDD space but many get banned trying it out too.
! Important Points to Remember regarding Cross-seeding.
If you want to seed multiple trackers with same data then you have to create .torrent with different piece size for different trackers. Changing piece-size change hash value, so trackers won’t get wrong stats. Cross-seeding is only recommendable for torrents you upload to trackers as you can change piece-size. For same data downloaded from different tracker with the same piece size will send wrong stats to tracker & you may get a ban on the cheating ratio.
To find out piece size of downloaded/uploading ‘.torrent’ this site is useful – Click Here or you can download this software – Click Here (don’t use software to manipulate ‘.torrent’).
To know piece size is same (at a glance) –
If you download same ‘.torrent’ from two different trackers & size of both ‘.torrent’ is same or differ only by 1-9 Kb in size that means both have same piece size.
4. Private torrent
The torrent site which requires registration for download or upload torrent & they keep stats of download or upload per member is known as Private torrent/ tracker. Now all private trackers use ‘passphrase’ for getting their member recognized by the tracker.
A passphrase is a sequence of words or other text used to control access to a computer system, program or data. A passphrase is similar to a password in usage but is generally longer for added security. Passphrases are often used to control both access to and operation of, crystallographic programs and systems.
Since we will go to upload our created torrent on one of the private trackers so we need to ‘check it.’
5. Start seeding
Do not ‘check it’ as now all private tracker use passphrase to keep track of stats, therefore you have to first create upload with created ‘.torrent’ file at tracker & then download it back from the tracker. Downloading ‘.torrent’ back from tracker will add your passphrase to it & then will be able to recognize you.
6. Create.
Once all field filled properly. Just hit it to start ‘.torrent’ creation process start.
7. Torrent URL
This is what you can generally find from the upload section of your private tracker, if they provide a specific announce URL you have to put it or you can ignore it.
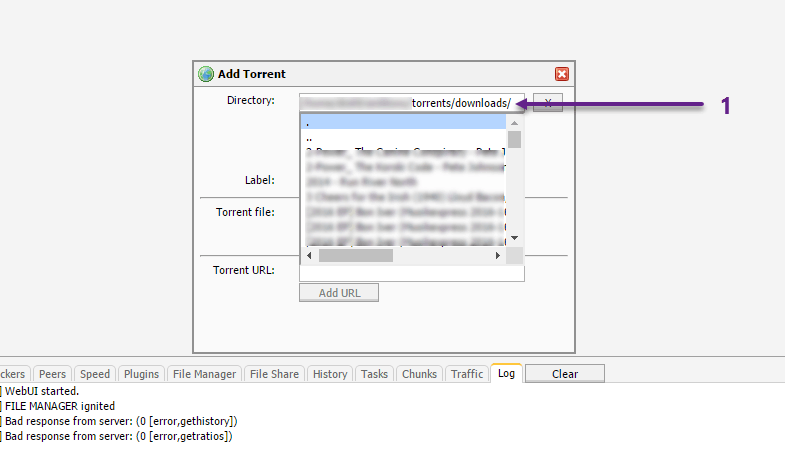
Step 2. Choosing Source of Data.
1 – Select Source – It shows your default download directory/ folder (for the first time you log in into the box). After first it will show you where you last left it.
! Points to Remember
” / ” – Indicate Directory End. If you don’t see ” / ” at the end of the name then it means it is a file. It is recommended to keep default directory intact for creating torrent. Using nesting of directories will cause trouble for newbies.
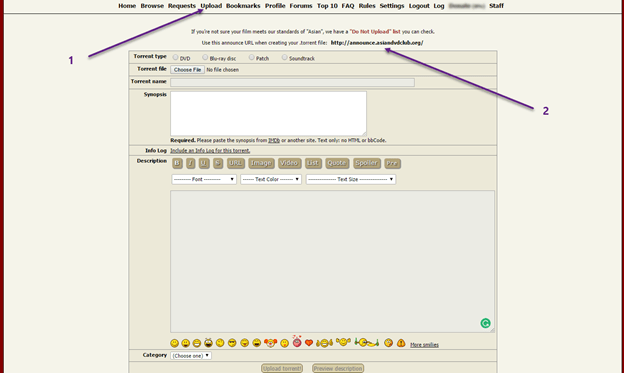
Step 3. Getting Tracker Announce URL – Just click on the upload button of your tracker & you will be able to show the tracker URL of your torrent site.
Step 4. Adding other required details.
- Create torrent of complete directory just select it & then click ‘X’ [at the end of ‘Select Source’]
- Announce demo URL added
- Must to ‘check’ for all Private trackers
- Final click to start creating ‘.torrent’
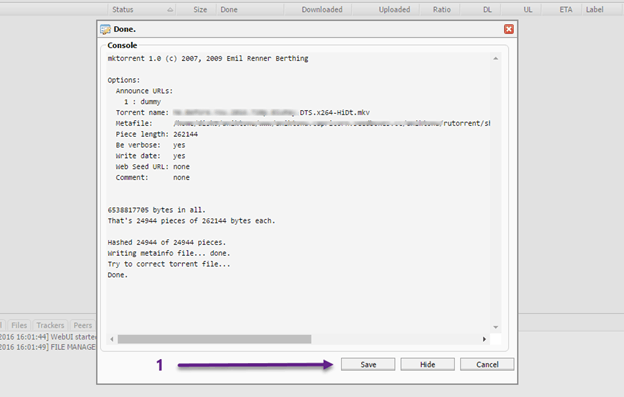
Step 5. Press “Save” to download ‘.torrent’ to your system. Torrent creation is done.
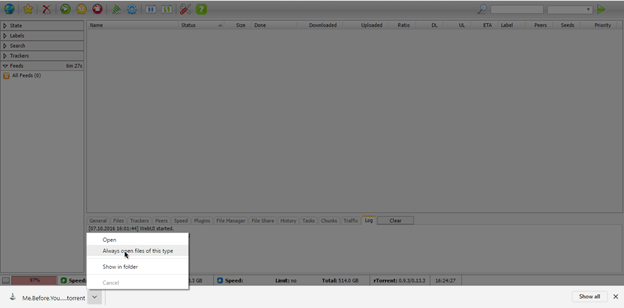
Step 6. Get a new torrent file. After click on the “Save” button (previous image) a new ‘.torrent’ will be downloaded to your system via your browser or download manager. You should be known to the source of the file as you need it to upload in the trackers upload torrent section.
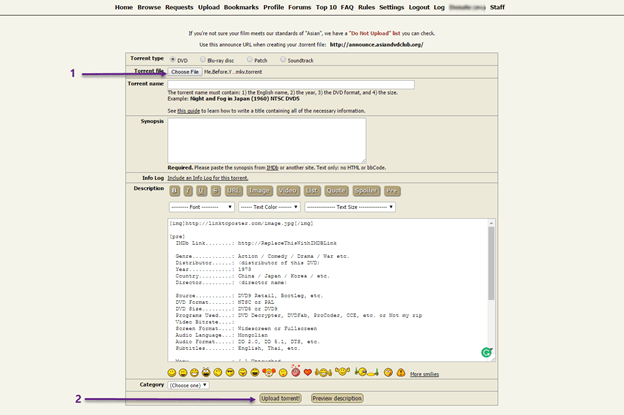
Step 7. The final part: now click on the choose file and select the file that was downloaded 2nd time during the creation of torrents (see the previous image). Click on the upload button and another new ‘.torrent’ will be downloaded to your system automatically via your browser or via the Download Manager.
Now add the last new ‘.torrent’ to your Seedbox normally. Done!
Happy torrenting 🙂
